Allocate customer transactions
Find this screen
Open: Customers > Enter Transactions > Sales Allocation
Watch a video
Allocate payments, receipts, credit notes and invoices (video)
How to
Allocate individual transactions
- Choose the
-
Enter the allocation date or choose it from the date picker
 .
.The Allocation Date is used to age transactions on the retrospective aged debt report and statements.
Note: If you enter a payment/receipt and choose to save and allocate, the allocation date will default to either today's date or the payment/receipt date. This depends on what you have chosen as the Default allocation date in
-
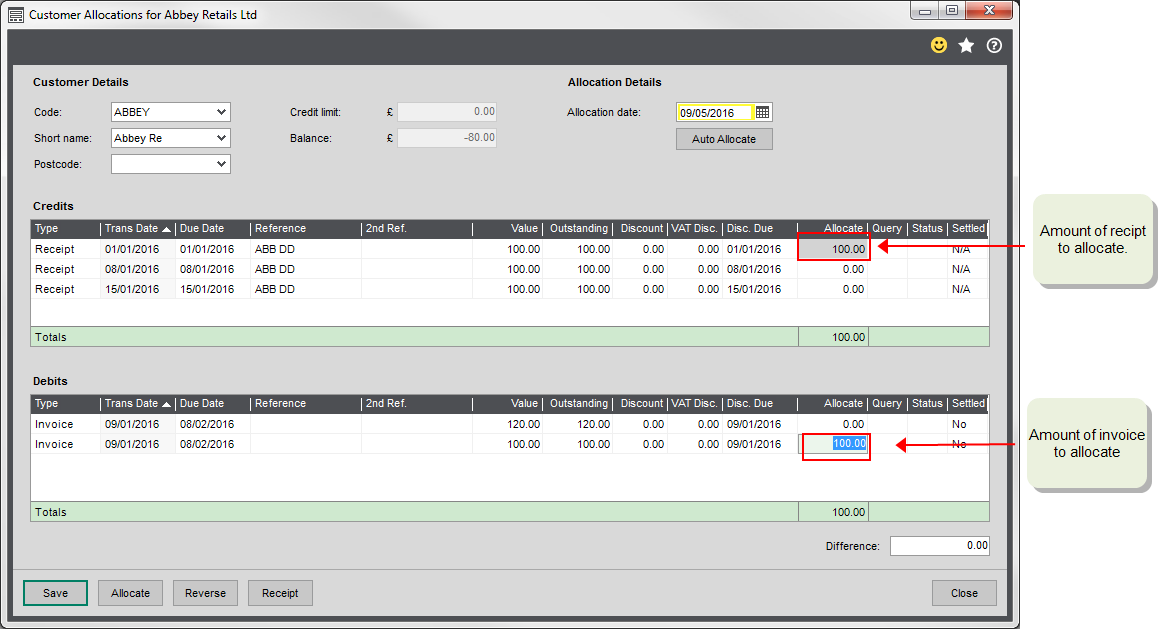
Choose a Credit (
-
Double-click in the Allocate column - this adds the full amount.
To part allocate, enter an amount in the Allocate column.
- Match to a Debit (invoice or refund) in the bottom section.
-
Double-click in the Allocate column - this adds the full amount.
To part allocate, enter an amount in the Allocate column.
- Click Save.
You can't save until the difference is 0.00.
You can:
-
Allocate more items until the Difference is 0.00.
-
Change the allocated amounts for the credits or the debits in the Allocate column, until the Difference is 0.00.
-
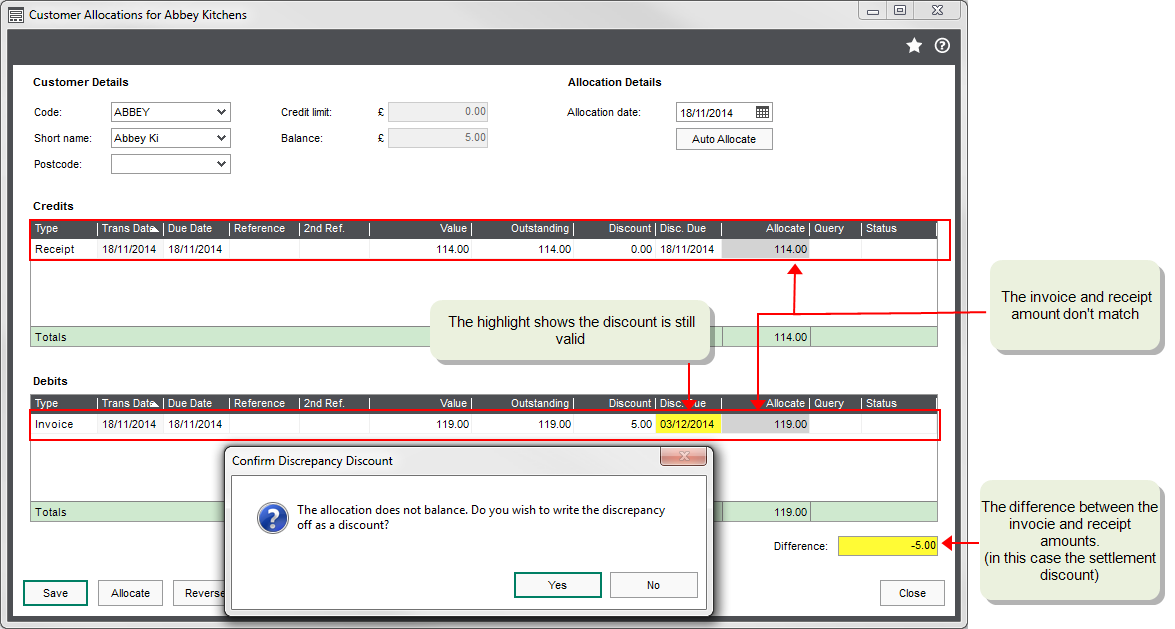
If the Debits total is more than the Credits total, a Confirm Discrepancy Discount message appears.
If you want to write off the remaining amount as a discount, click Yes. The remaining amount is posted to the Discounts Allowed and Debtors Control nominal accounts.
-
If the Credits total is more than the Debits total, a Confirm Reduce Credit message appears.
If you want to reduce the allocated Credit, click Yes. The allocated value is reduced and the receipt is marked as part allocated.
Allocate transactions automatically
This adds up all the credit transactions and allocates them to the debit transactions in date order, starting with the oldest. Where amounts don't match exactly, the remaining amount is part allocated.
This is very quick and all outstanding
- Choose the
- Enter the allocation date or choose it from the date picker .
-
Click Auto Allocate.
An Allocate value is entered for the all transactions until the difference is 0.00.
- Click Save.
Set or remove a query flag
Use this to mark transactions as queried whilst you investigate. Once the transaction has a query against it, it can't be allocated.
You can use any character that's meaningful to you
W means that the transaction has been marked as a bad debt for write off.
-
Select the transaction you want to query.
-
Enter the character you want to use in the Query column
-
To remove a query, clear the Query column.
Reverse (cancel) all allocations
Use this to cancel or unallocate everything on the screen. All the allocated amounts are cleared and you can start again.
To change an allocation that's already been saved, use the Amend Allocations screen.
-
Click Reverse.
-
Choose whether to reverse:
-
Debits and Credits - this clears everything on the screen.
-
Debits only - this just clears the debits.
-
Unallocate a single transaction
- Find the transaction(s) to unallocate.
- Change the Allocation value. To completely unallocate it, change the value to 0.00.
- Find the corresponding Debit or Credit transaction, and change the Allocation value.
- Once the Difference is 0.00, click Save.
Create and allocate a new receipt
If you've realised you've got a
-
Choose the invoice you want to pay and click
The Enter
- Check that it's the right bank account and change where necessary.
-
Check the details and change where necessary.
The amount, and a reference of Allocation are already entered.
-
Click Save.
The
Change a saved allocation
Once you've saved an allocation you can still change the allocated amounts or allocate to a different transaction. You do this using the Amend Sales Allocation screen.
Search for:
-
Choose the
-
Find the transaction to change. Search by:
-
Type - choose from the drop-down list.
-
Date - enter the transaction date or use the date picker
. -
Reference - enter the reference.
-
-
Click Display.
-
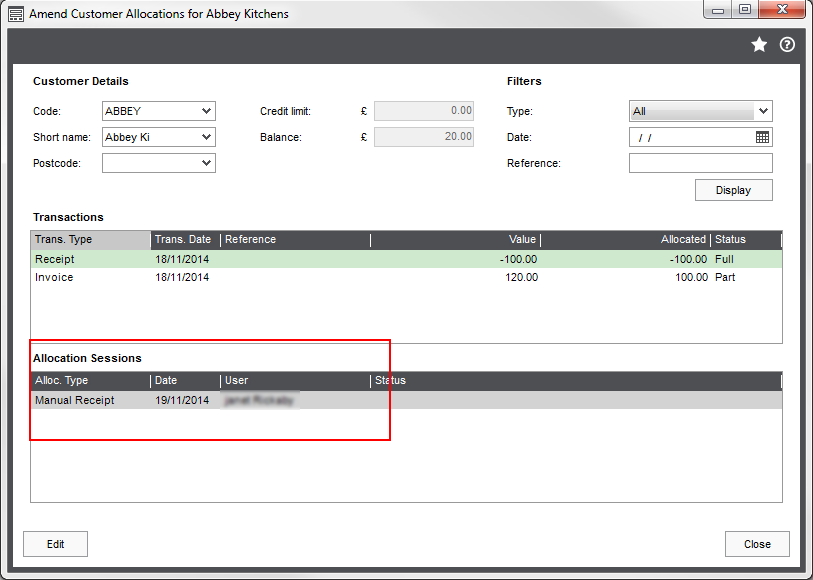
Select a transaction or session.
If the transaction was allocated in more than one allocation session Details of the all receipts matched to invoices and saved together., all the relevant sessions are displayed.
The Alloc Type shows whether the transaction was allocated by you or by a Sage 200 process, such as contra entry or write off.
-
Click Edit. This opens the allocation screen and displays the details of the transactions allocated in the session.
Useful info
Tips for allocating transactions
- Use Auto allocation for allocating large numbers of transactions quickly and you don't mind which invoices are matched to receipts.
- Don't use Auto Allocation if you're allocating transactions with settlement discounts as it's hard to work out whether remaining amounts are part payments or discounts.
- Double-click in the Allocation column to automatically enter the outstanding balance.
- If a date's highlighted in yellow, then the settlement discount is still valid.
-
If you don't want an invoice to be allocated, give it a query flag here or on the Transaction Enquiry.
Allocating foreign currency transactions
When foreign currency transactions are allocated, the exchange rates entered on the transactions are compared.
If there is a difference, the exchange gain or loss is calculated and posted to the following nominal accounts:
| Nominal Account | Debit | Credit |
|---|---|---|
|
|
Gain | Loss |
| Exchange Differences Account | Loss | Gain |
You enter an invoice for $100 for US customer. When the invoice is entered the exchange rate is £1 = $1.5. The invoice is worth £66.67.
The customer pays you $100. When you receive the money the exchange rate is £1 = $1.6. You've received £62.50.
When you allocate the receipt to the invoice, your loss of £4.17 is posted as follows:
| Nominal Account | Debit | Credit |
|---|---|---|
| Debtors Control Account | 4.17 | |
| Exchange Differences Account | 4.17 |
Writing off discrepancies as discounts
If
When you enter the details of the
- The
- The discount amount is posted to the Discounts
However, if you enter the
For example, your invoice total is £119. You've entered a payment of £114 as
Allocation dates
When you save the allocation, a history of all the transactions that have been allocated together is saved using the allocation date. This creates an Allocation Session.
The details of these sessions can be seen when amending allocations. They show you who allocated them and all the transactions included in that session.
What happens when
Save the allocation
Once the Difference is zero, you can save the allocations. When you save:
-
A history of the allocated transactions is saved in an allocation session Details of the all receipts matched to invoices and saved together. using the Allocation date.
These sessions can be seen when amending or unallocating transactions. They show you who performed the allocations and show all the transactions included in that session.
- The allocated transactions are marked as paid and the outstanding value changed to 0.00. (or the remaining value if it's part-allocated).
- The
- Your nominal accounts are not affected.